Raspberry Pi Initial Setup
Materials
I recommend using one of the two kits below from Adafruit. Which one you should choose depends on the nature of your IoT project.

Raspberry Pi 2 Model B Starter Pack
If you've never used a Raspberry Pi before, go with this kit. This kit contains everything you need to begin using the Pi with both Internet and hardware projects. The included electronic components allow you to follow Adafruit's Getting Started with Raspberry Pi learning tutorials.

Onion Pi Pack w/Large Antenna
This kit contains just the things you need to get an Internet-connected Pi project up and running. The included SD is pre-loaded with a version of Raspbian with router and Tor proxy software, but you can always format and reinstall the distro you want.
Selecting a Distro
The Raspberry Pi is capable of running a large number of operating systems. The Embedded Linux Wiki maintains a comprehensive list of distros for the Pi. However, the folks at the Raspberry Pi Foundation host the most popular versions and the installer on their downloads page. If you want to keep things simple, go ahead and download NOOBS (New Out Of Box Software) with Raspbian included and skip to the next section. If you don't even want to do that, you can buy SD cards with the same software pre-installed. There is a second version called NOOBS-lite that does not include Raspbian which is used to download and install any of the officially supported distros. The advantages of using this is that the vanilla installer is much smaller in terms of disk space and the Pi will always install an up-to-date version of the desired distro. However, the Pi will need to be connected to the internet (either WiFi or Ethernet) in order to download the distro in-place.
Raspbian -
Raspbian is a fork of Debian, the oldest and most supported version of Linux. It is the official distro from the Raspberry Pi Foundation and offers the biggest support community and hardware compatibility. Unless you need very low-level hardware access, this is the distro for you.
Pidora -
Pidora is a Fedora Remix built for the Raspberry Pi. Fedora is supported by Red Hat and constantly kept up-to-date with the bleeding edge of technology. It offers some of the best security software, but is not great for long-term IoT projects since each version is only supported for 13 months after its initial release.
RISC OS -
Unlike the majority of OS's made for the Raspberry Pi, RISC OS is not based on Linux or Unix. It was the first ARM-based OS and built by the same developers who made the ARM chip-set. There are very few layers between the software and hardware allowing developers to write very fast, low-level code. It's also very small and "moves out of the way" when running your applications.
With the release of the new Raspberry Pi version 2, Microsoft and Canonical have announced they intend to release versions of their own operating systems, Windows and Ubuntu respectively, to run on the updated hardware. Snappy Ubuntu Core is already available on the downloads page.
Prepare SD Card
When choosing your SD card for the Pi, you need only worry about capacity and form, not the manufacturer. My recommendation is a 16GB Micro-SD card with a Micro-to-Standard adapter. The minimum recommended capacity is 4GB, but that leaves less than 2GB for programs and media storage. With 16GBs, you won't ever have to worry about running out of space (for normal use cases). As for the form, the A+, B+, and B2 all use Micro-SD card slots whereas the A and B use standard. Having a Micro SD and adapter allow you to use the OS with any version and makes it far more likely that you can set up the SD card with your own computer.
Formatting a disk erases all of its contents! Take care that you don't start erasing your own computer!
Whether or not there's anything currently on it, you should always format the SD card before installing your chosen OS. While not true for every distro, most say to use the FAT32 (File Allocation Table) format. In addition, you should choose the "slow" method (overwrite with zeros) if the option is available. For Windows, I recommend using SD Formatter from the SD Association. Mac and Linux have their own Disk Utility / Disks which do a great job. If you have a Mac, however, I recommend using the program I mention below.
If you downloaded either version of NOOBS, all you need to do is copy all of the downloaded folder's contents onto the SD card and eject it. If you'd rather install the OS without NOOBS or it is not supported by NOOBS, go here to read the Raspberry Pi Foundation's installation guide. They have instructions for Linux, Mac, and Windows. If you use a Mac, however, I highly recommend using a free program called ApplePi Baker. It provides an easy graphical interface to format SD cards, install your OS, and back up your current image all tailored for the Raspberry Pi.
Once your OS is installed, it's time to boot and configure your new OS.
First Boot
First off, there are two primary ways of interacting with the Pi upon first boot. The first way is using a USB keyboard and connecting the Pi to a display with an HDMI cable. The second way is using a USB console cable with the GPIO pins and your laptop. This allows you to use your computer's keyboard and screen to interact with the Pi. If you don't know how to use a console cable, Adafruit has a quick tutorial on using a console cable with the Pi. There's a third way which lets you SSH into the Pi if it's connected to your network via Ethernet, but you should only use it if the other two options are not available. I would also recommend not changing any files (like wpa_supplicant for WiFi) before expanding the disk during setup.
From this point on, all of the screenshots and setup specifics are for Raspbian and other Debian-based distros.
Upon first boot, the Pi should display the screen shown below. This program is included in most, if not all, RasPi distros. If you get a login prompt instead, the default username/password combo is pi/raspberry. Then enter sudo raspi-config on Raspbian. Pidora has a similar config tool called firstboot.
1 Expand
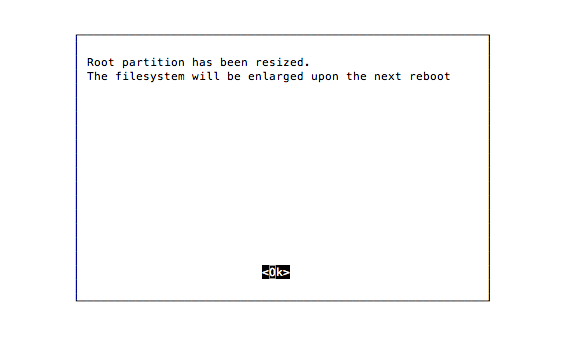
The first step is to expand the file system so that the OS can use all of the SD card.

2 Change Password
It's hard to change the username, but it's easy to change the password. This is the fundamental level of security for your Pi. Another person could easily hijack your Pi if the default password is still in place
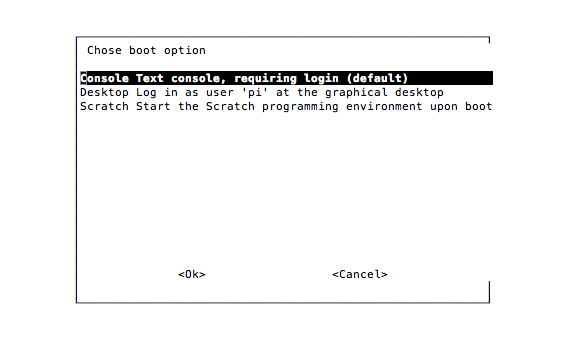
3 Boot Style
The default UI is a terminal prompt. If you'd rather have the desktop always show, change it here. Enabling boot-to-desktop is not necessary to run GUI interfaces at boot.
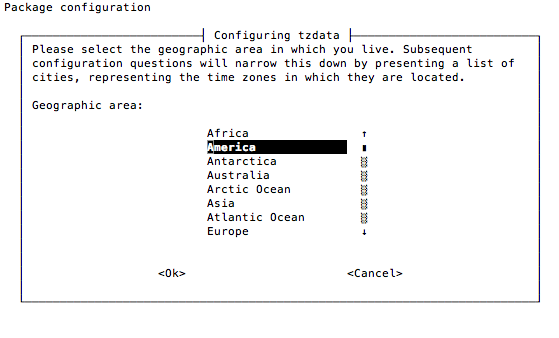
4.2 Timezone
I've found it's not necessary to change the locale setting. However, it's a good idea to tell the Pi what timezone it is in.
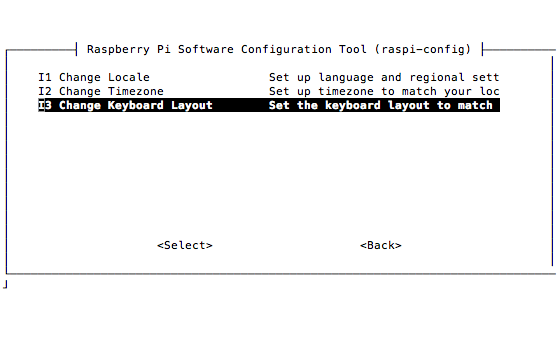
4.3 Keyboard
If you're in the US, the keyboard layout needs to be changed. It's nearly impossible to get the # sign without doing so. There's an easier way to do this I mention below.
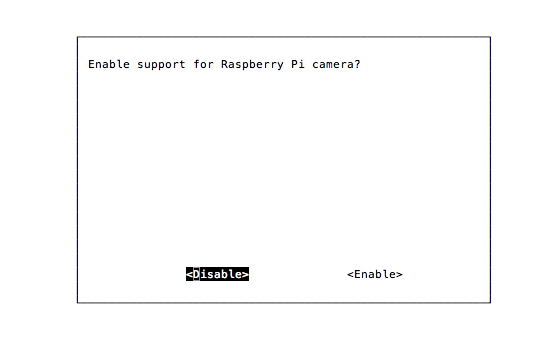
5 Camera
Enable this if your IoT project makes use of the Pi Camera. This menu can always be reached later if you change your mind.
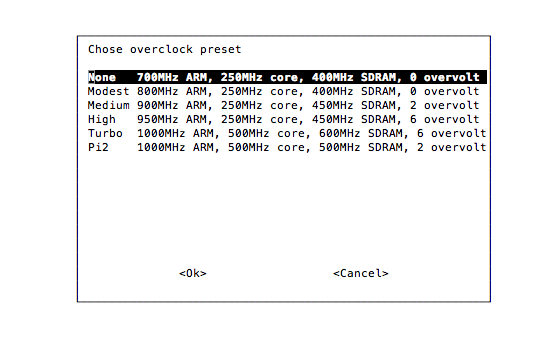
7 Overclock
The CPU can be told to run up to 40% faster than its default. However, this introduces a greater chance of instability in the Pi and is not necessary for most long-term IoT projects. Overclocking also leads to greater power draw.
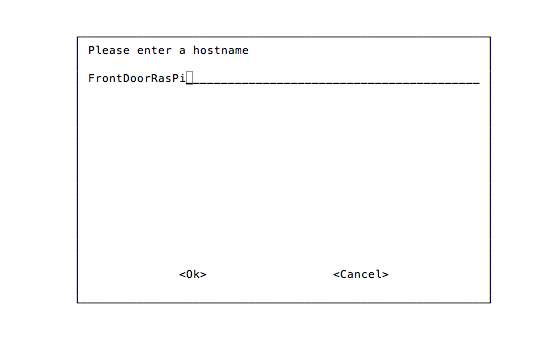
8.2 Hostname
The Pi should have a unique hostname based on your project like "WeMo-Pi-Controller". This way you can always tell which Pi is which during a network scan or ssh session.
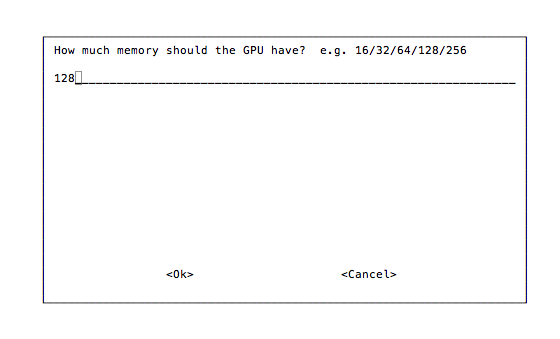
8.3 Memory Split
While not recommended for most cases, you might have to allocate more memory for the GPU if the Pi is performing graphics-heavy operations.
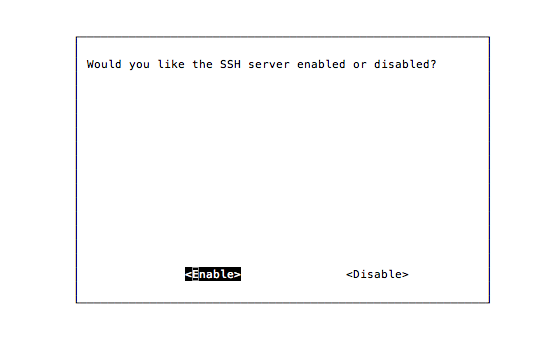
8.4 SSH
This is enabled by default. If the Pi will only be controlled via Serial or USB keyboard, disable SSH.

8.6 SPI
If your project uses a Pi Hat or any other kind of plate, you might have to enable the SPI kernel for it to work.
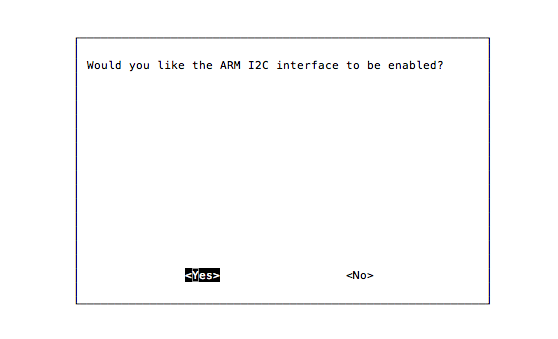
8.7 I2C
I2C ("eye squared see") is another hardware communications protocol like SPI. If you're connecting the Pi to other hardware and logic boards via the GPIO pins, I recommend enabling both.
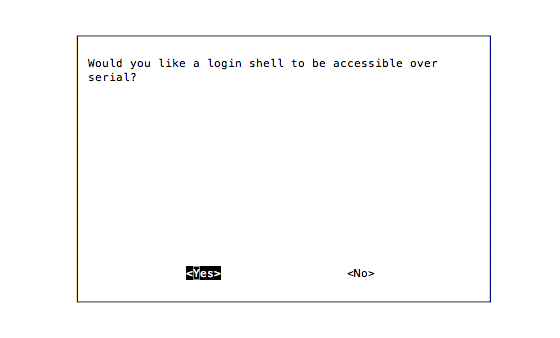
8.8 Serial
Allow or lock using a serial cable to control and display the Pi. Unlike SSH, accessing via serial requires physical access, so I recommend leaving this enabled.
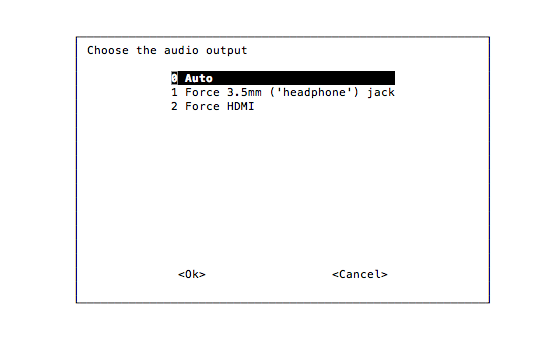
8.9 Audio
The Pi detects where to output any audio signal. However, you can force the Pi to use HDMI or the audio jack for audio output. It's useful when making a speaker system with an HDMI visualizer.
Once everything has been set, go to finish and reboot the Pi.
Updating etc
Upon second boot, the Pi should show a terminal login screen or a desktop if option 3 was changed (open up a terminal window to follow along). Login with username pi and the changed password...the password was changed, right?
If the keyboard layout couldn't be changed in raspi-config (it is the most finicky component to configure with that utility), here is the simple way to do so. We are going to open a file and change two letters; that's all it takes. Type sudo nano /etc/default/keyboard into the terminal and a text editor should appear with a top line that says # KEYBOARD CONFIGURATION FILE. Find the line that says XKBLAYOUT and change its value to your keyboard's layout, ie US:"us", UK:"gb", Spanish:"es", French:"fr", German:"de", Russian:"ru". Press ctl+x to save and enter Y to confirm the save. If you got a write error, it's likely the terminal command didn't start with sudo. The great thing about this fix is that it works on all Debian-based Linux distros including Raspbian and Ubuntu.
Next up the Pi needs to get connected to the internet. The simplest way is to connect the Pi to a router via an Ethernet cable. If the Pi doesn't need WiFi access, click here to skip to the next section. First let's test to see if the Pi is already connected. Type ifconfig to print the Pi's network status. We're looking for a line that contains inet addr:192.168.x.x where 192.168.x.x is your internal IP address. If the Pi is connected via Ethernet, you'll find it under eth0. If by wireless adaptor, wlan0. If wlan0 doesn't have an IP address, we'll need to configure it. The easiest way to do it is via the WiFi utility found on the desktop. However, if you're stuck using a terminal, we'll need to edit a file in nano.
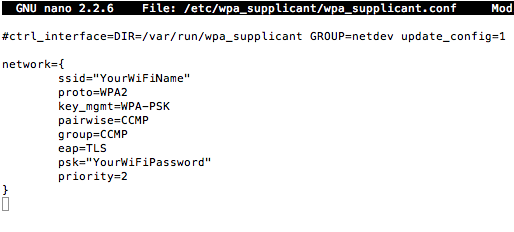
The specific file we need is called wpa_supplicant.conf.
sudo nano /etc/wpa_supplicant/wpa_supplicant.conf
Comment out '#' any lines that already exist. Note that this effectively turns off the UI WiFi config version. Of course this can always be reversed. The "network" lines shown in the screenshot will work for most setups because WPA2 is the current strongest form of encryption. Make sure to replace the ssid and password with your own. If this setup does not work for you, check out this page for more configurations. Now reboot the Pi with sudo shutdown for the changes to take effect.
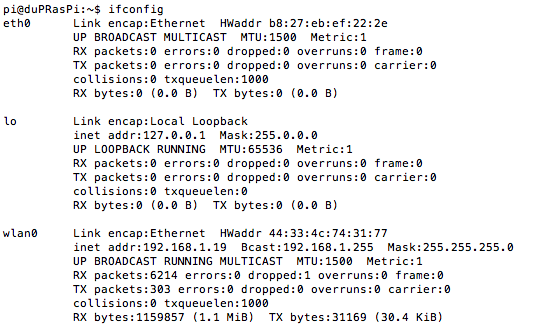
Once the Pi is back up, run ifconfig again and see if you have an IP address. The screenshot shows a Pi with a wireless IP address of 192.168.1.19 . If it were connected by Ethernet, this line would instead appear in eth0.
Now that the Pi is connected to the Internet, the first thing that should be done is bring its software up to date. This can be done with the following line:
sudo apt-get update;sudo apt-get -y dist-upgrade
It's actually two commands; the upgrade will start immediately after its local repositories are updated. Depending on how long ago the most recent distro release was, this might take a while, especially if your Internet connection is slow. Once everything is done, reboot the Pi for any changes that need it.
Easy atBoot
One of the best uses for the Pi: embedded projects. One of the hardest things to figure out: how to get your program to start at boot. Rather than trying to hack together a solution or edit system files, we can create an easy "at boot" file in the home directory using a program called Crontab. Crontab comes with Raspbian and is used to schedule events on the system. We'll use it to make a file run when the Pi boots up.
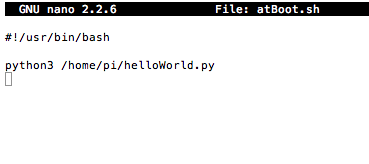
First let's create a new Bash file in the home directory.
nano ~/atBoot.sh
This will be the file we tell to run at start up. Rather than changing the crontab every time we want to change our project, we can instead use this atBoot.sh file. There are a few advantages to doing it this way. First, we can easily execute multiple programs. Second, we can execute terminal commands in addition to files, so it's possible for the Pi to automatically update itself on boot every time. Lastly, we'll always be able to find our atBoot.sh file because it's sitting right in the home directory. Before moving on, change its permissions so that the file can be executed.
chmod 755 ~/atBoot.sh
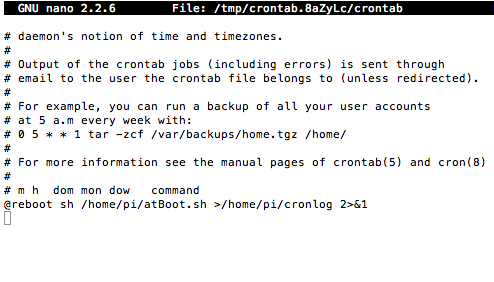
sudo crontab -e
This will open up our Crontab file. Then add this line:
@reboot sh /home/pi/atBoot.sh >/home/pi/cronlog 2>&1
The line reads: At start up, use Bash to run this file and send any prints/errors to another file
That's all there is to it. Now any terminal command in atBoot.sh will always run at start up. A two caveats about using this method. First, every terminal command and program run will have root permissions as it is the root user that automatically executes them. Any file or folder created by these programs will require root permissions to read and write to. Second, because the root user doesn't have a home directory, ~ extensions do not work. No problem though. Just expand the file paths yourself by replacing '~/' with '/home/pi/'. If you forget to do this, you can always use "sudo find / -name file.txt" to find the file for you.